
Hey there,
Welcome back to the 🧭Microsoft 365 Compass🧭Newsletter! Following up on my last email about personal task boards in Teams, I'm excited to share how to automatically turn emails into Planner tasks. This is a huge time-saver, especially when action items flood your inbox. Let's dive in!
P.S. Thanks so much for all the enthusiasm about this topic! I really appreciate your patience. I know some of you were eager to see this tip sooner, and I apologize for the slight delay. Life (and a couple of snowstorms and a touch of the flu!) sometimes gets in the way. It's fantastic to know so many of you are finding this content helpful – your engagement makes it all worthwhile!
How To Move Emails into Microsoft Planner
Getting emails into Microsoft Planner is incredibly simple—most of the time (9/10 cases), no setup or configuration is required. To automatically create tasks from Microsoft Outlook emails, you can use the Flagged Emails integration by following these steps.
Step 1: Flag an Email in Microsoft Outlook
- Open Outlook and navigate to the email that requires follow-up.
- Right-click the Flag icon to mark the email as important.
- Optionally, set a due date by specifying both a start and an end date to ensure timely action. These dates can always be adjusted later in Microsoft Planner.

Viewing Flagged Emails in Microsoft Planner
Once you flag an email, you can easily access it within Microsoft Planner by following these steps:
-
Open Microsoft Planner in the app rail.
-
Click on My Tasks.
-
Select the Flagged Emails chip to see all flagged email.

This will display a list of task cards created from flagged emails. To view task details, simply click on a task card, where you can update details such as the start date, due date, progress, priority, and notes. One important note about tasks created from flagged emails is that they do not support comments or an Assigned To field. This is because these tasks are assumed to be personal follow-ups rather than team assignments.
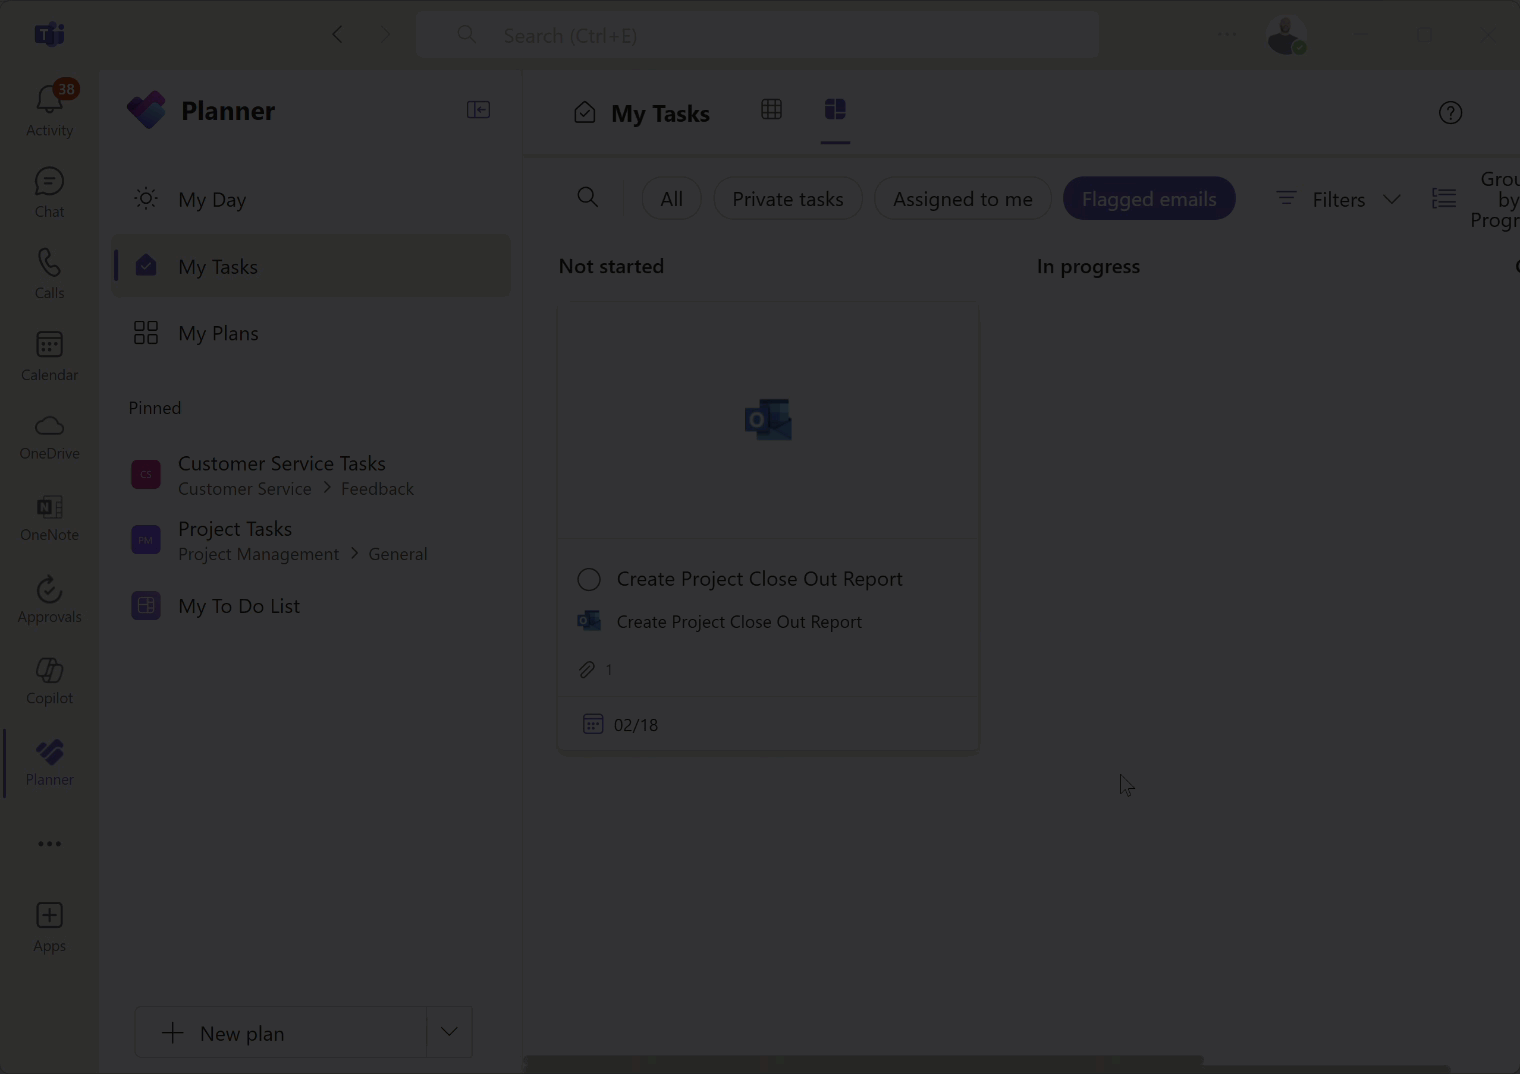
Another great feature is that the flagged email is automatically attached to the task card. Clicking on the attachment will open the email in Microsoft Outlook on the web, allowing you to quickly reference its contents.

How Outlook Emails Become Tasks: Choosing the Right Tool
Okay, so how does this work? Well, when you flag an email in Outlook, it automatically creates a task in Microsoft To Do, which is Microsoft's tool for managing personal tasks. To Do is great for keeping track of individual responsibilities, but it doesn't provide visibility into team-based work.
If you're looking for a more complete view of all your tasks—both personal and team-related—I recommend using Microsoft Planner instead. Planner integrates with Outlook, Teams, and To Do, giving you a unified way to manage tasks across different projects and teams. This means you can see everything in one place, rather than jumping between multiple apps.
What If This Doesn't Work?
I mentioned earlier that 9/10 times, no setup is required. But what about that one time when it doesn’t work?
In most cases, the required setting is turned on by default, but if flagged emails aren’t appearing in Microsoft Planner, follow these steps to ensure the setting is enabled:
-
Go to Office.com and log in with your Microsoft account.
-
Click on the menu icon and select Microsoft To Do.
-
Click on Settings (gear icon).
-
Scroll down and ensure that Flagged Email is toggled on.
Once enabled, flagged emails in Outlook should begin appearing as tasks in Microsoft Planner through My Tasks.
That’s how you can stay on top of your crowded inbox by seamlessly moving emails that require follow-up to Microsoft Planner. Did you find this tip helpful? Did it not work for you? Do you have a follow-up question or tip about moving emails to Planner? Hit reply and let me know! Until next 🧭week🧭happy organizing!
Enjoyed This Content?
If you found this content helpful, consider showing your support by Buying Me a Coffee. Your generosity helps cover the costs of the tools and services I use to create valuable content and keep it coming your way. Thank you for your support!
Got Questions or Ideas? Let's Connect!
Are you facing a challenge with a Microsoft 365 app? Have a tutorial idea you'd like to see covered? Or perhaps you're looking for personalized coaching and guidance to make the most of Microsoft 365? If so, just hit the reply button and get in touch—I’d love to hear from you! Your feedback and ideas help shape the content I create, ensuring it’s tailored to your needs. Let's work together to boost your productivity and tech skills!
Looking for a Previous Tip? 🔎
Did you know? You can quickly find all past editions of the 🧭Microsoft 365 Compass🧭 newsletter in one place! Just visit this section on my website — no need to dig through your inbox. Catch up on tips, tricks, and tutorials anytime! 🚀
🚀 Boost Your Career with Python & Microsoft’s New Certification🚀
In the past, I’ve shared how Coursera Plus helps me stay sharp with tech skills, offering courses, certifications, and more. Lately, I’ve been looking to dive into Python, a language that’s rapidly growing in demand across industries. Well, exciting news — Microsoft just launched its Entry-Level Python Developer Professional Certificate on Coursera! 🎉
This program is designed to take you from beginner to job-ready in under 12 months, covering Python fundamentals, automation, web development, data analysis, and even AI tools. It’s 100% online, self-paced, and starts at just $49/month with a free trial. Plus, you’ll earn a Microsoft-backed certification to boost your resume.
If you’ve been thinking about learning Python, this is a perfect opportunity to get started! 🔥 Ready to level up? Check it out now! As a Coursera Plus affiliate, I may receive a commission for eligible purchases at no additional cost to you. Proceeds help support sharing these actionable tips with you!


Responses